Sunday, September 30, 2012

Christmas in October....

If you want to get a head-start on your Christmas cards, tags, bags & boxes...October is the month for you!!! 
 
Welcome to this month's SOTM Blog Hop featuring the stamp set, Very Merry Christmas.  The red outline means you can cut these images using the Artiste Cricut Cartridge!!!  How easy is that!
If you've come from Krista's Blog, you're on the right track...just keep hopping along 'till you get back around to where you started!
 
Here's what I decided to do this month using Pear & Partridge Paper Packet...It's a gift-card holder or in this case a cold-hard-cash holder...lol. The Artiste cuts this handy little card and even cuts the slit to hold the cash (you'll see that further down)...
----------------------------
Here are a couple of closeups from different angles...

----------------------------------
The nifty little thing about this tag is that it is removable and can be used by the recipient on one of their presents that they give to someone else...what a deal!
 
--------------------------
And here is what the card looks like with the tag removed...notice my tone-on-tone stamping!
--------------------------------
Here's a peak of the inside...


That's all I've got for now...
 
Keep hopping to LeAnne's Blog and see what cute thing she has to share!
 
Don't forget...you can get this stamp set for only $5 with a qualifying order from October 1 thru the 31st!  What a CUTE stamp set to use on all your Christmas crafts!
 

Thursday, September 27, 2012

Charmed Mojo...

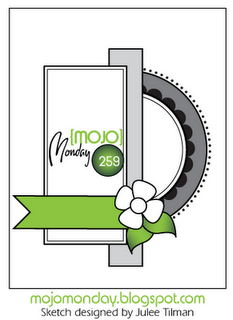
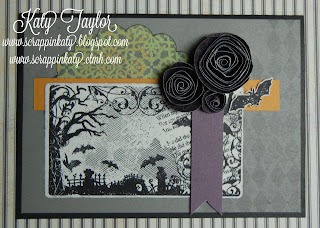
I made this card for last week's Mojo Monday sketch but didn't get it in in time...


Oh well...you guys can still enjoy it!!!

I used Moonlight Paper Packet, All Hallows Eve (bat and tiny argyle images in the lower right corner and top left) stamp set and Backdrop-Charmed stamp set...
----------------------------
----------------------------
------------------------------

Wednesday, September 26, 2012

Moonlight Layout Workshop...

Here's a peek at my Moonlight Layout Workshop for October...


------------------------------------------
These are journal pockets and the larger one can even be used for another picture...
(you can click on the photos to see all the detail)
Each Kit comes with cutting diagrams and step-by-step assembly instructions.  You can order your Kit {{{HERE}}}!  You will receive the cutting diagram and instructions via e-mail when your order ships.
If you're local, let me know and I'll add you to my order this weekend!  The workshop is Saturday, October 6th at 2pm.  Payment reserves your spot!
You can also get the Workshops on the Go Kit if you're interested in the CUTE LITTLE STAMP SET that comes with it!!!  Just add it to your cart and delete the Moonlight Paper Packet and Haunted Assortment at checkout since you get both of those with the WOTG Kit.  Here's the stamp set...CUTE, huh!
 
Any questions....just ask!

Wednesday, September 19, 2012

Daisy Thank You...

Thank You Gift Card Holder...
The card base is an envelope (a gift card went inside)....licked and sealed then cut at 1-1/2"...you just slide the 1-1/2" top over the bottom by 1/4" and then you have a card (let me know if you need clarification)...

 ------------------------------
This is the top almost off the bottom....
 --------------------------------
This is the top totally separated from the bottom (please excuse the photos...I had to take pictures in the car before I delivered them...lol)

Friday, September 14, 2012

Home for the Weekend - Pear & Partridge Star...

Welcome to the first Home for the Weekend where I will show you one of CTMH's My Creations
items each week that can be used in your Home Decor.  You'll also see some of these used in my upcoming My Creations Monday.


Today we start off with probably one of the MOST POPULAR new items from the Autumn/Winter 2012 Idea Book...the My Creations Star.  It is a pre-assembled chipboard, 3-D star with a hole in the back for easy hanging. It measures 12" and is made of white chipboard which is perfect for direct stamping, rubons, or covering with B&T.
Here it is made up with CTMH's NEW Pear & Partridge Paper Packet...
-----------------------------------------------
Here are a bunch of closeups (You can always click on the photos to see them larger and in more detail)...


------------------------------------
Here's how I did the Merry Christmas...
------------------------------------------
Use Glue to adhere the two together...
----------------------------------------
Distress the edges...

Thanks for stopping by...I hope you found some inspiration for using CTMH's My Creations Star. 
Don't forget to check back during the week to see other great projects using some of the NEW products from CTMH's latest Idea Book.
If you'd like to purchase any of the wonderful things you saw in today's post, head over to my website and start shopping!!! 

Thanks to my wonderful friend and sideline, Sylvia, for helping me with this one!!! 


Thursday, September 13, 2012

Moonlight Mojo Monday #258

I'm so excited to be sharing my second go at a Mojo Monday sketch!

--------------------------------------
This is how my card came about...

I had been playing with my NEW Moonlight Paper Packet and Moonlight Complements Dimensional Elements and the wonderfully illustrated DE images were just SCREAMING "use us...use us" so I did!!!  I love how this card turned out...and, aside from me using some black ink to distress around the edges, I didn't even get my fingers dirty!


-------------------------------------------

--------------------------------
I'm hoping you can see the Prisma Glitter on the moon and the outline of the focal point...

----------------------------------
------------------------------------------
Here are some closeups of the dimension that these Moonlight Complements have...


------------------------------------------
Here's the inside....isn't that little owl the CUTEST!!!


Tuesday, September 11, 2012

Square is Cool...

It's Tuesday again which means that it's time for "Two for Tuesday" which is where I take one sketch and make two cards...
 
Here are some cards I made using an old Mojo Sketch...
 
This first one is using some circle scraps left over from this layout...I also threw in some scraps of a couple of NEW Paper Packets...Dakota (the slate wood paneling B&T) and La Belle Vie (the black B&T).  The bright, shiny silver piece is not paper at all but instead it's our NEW ADHESIVE-BACKED SILVER TRIM {{{I heart this stuff}}}!

 
--------------------------------
Here's a second one purely because I just had to play with some more FLIRTY paper....LOVE, LOVE, LOVE this paper!!!  I used the coordinating Autumn Lane Assortment (pins and "Family" sentiment) as well as some Black Striped Grosgrain Ribbon and Black Tulle...


Sunday, September 9, 2012

"baby GIRL" {dotty chevron} layout...


Layouts are truly one of my favorite things to create but since my time comes sporadically between diaper changes, homework and various sports activities, I often find myself  making cards cause they're kinda like instant gratification for me...lol

I had time the other night during my 3-day Labor Day weekend to finally sit down and put pictures, card stock and B&T together using some inspiration from Pinterest { Follow Me on Pinterest if you're not already!}.

Here's what I came up with using all retired paper (sorry but I LOVE ME SOME Lucy {pink chevron} and Dotty For You {Sweet Leaf polka dot, Grey Flannel polka dot and Lagoon damask B&T} for the Chevrons)...I also purchased a FULL package of Grey Wool Cardstock right before they came out with Slate so I had to use it up too! 


-------------------------------------------
Here's a single view of the page on the left...

---------------------------------
Here's a close-up of the chevrons...title...and date banners. I made my banners by folding the Dotty Paper using this post from Lily Bee Designs as inspiration. I had to do some major playing around to get it correct....lol


----------------------------
Here's a look at how I got my title using CTMH's Keepsake Felt Alphabet to line up...I take our Ruler - line it up on my Versamat across the layout...it's really easy to do because our ruler is 14" long.  I stick the letters half on my layout, pressing down firmly, and the other half on the ruler MAKING SURE not to press down firmly so that they barely stick and will be easy to peel off the ruler.  Once I have them lined up, I lift the bottom portion of my ruler to a 45-degree angle and start peeling off the letters...once they are all peeled off the ruler, I remove the ruler and press down firmly on the entire letter, securing it to the layout.

--------------------------------------
I used various CTMH Dimensional Elements letters for "GiRL"

------------------------------------
Here's a closer look at the right side layout...

------------------------------------
Close-up of my flowers...I just free handed some circles of various B&T patterns used on the Chevrons, edge-distressed them with this handy tool and put Shimmer Designer Brads in the centers.  I love that they almost look like frayed fabric!


 Thanks for stopping by and letting me share my "baby GiRL" with you!!!